
도슐랭스타
API-KEY, Bean 중복, Preflight (OPTIONS) 요청 본문
클라이언트는 요청 시에 헤더에 API 키를 포함하고, 서버는 그 키가 유효한지 확인해서 접근을 허용하거나 거부하는 간단한 인증 방식임.
application.properties
app.api-key=my-secret-keymy-secret-key부분에 쓸 api key 입력하면 됨
밑의 방식은 에러가 났음.
ApiKeyFilter.java
package me.dodo.readingnotes.config;

import jakarta.servlet.FilterChain;
import jakarta.servlet.ServletException;
import jakarta.servlet.http.HttpServletRequest;
import jakarta.servlet.http.HttpServletResponse;
import org.springframework.beans.factory.annotation.Value;
import org.springframework.stereotype.Component;
import org.springframework.web.filter.OncePerRequestFilter;

import java.io.IOException;

@Component
public class ApiKeyFilter extends OncePerRequestFilter {

    @Value("${app.api-key}")
    private String expectedApiKey;

    @Override
    protected void doFilterInternal(HttpServletRequest request, HttpServletResponse response, FilterChain filterChain)
            throws ServletException, IOException {

        String apiKey = request.getHeader("X-API-KEY");
        System.out.println("요청 헤더에서 API 키: " + apiKey);

        if (expectedApiKey.equals(apiKey)) {
            filterChain.doFilter(request, response); // 통과
        } else {
            response.setStatus(HttpServletResponse.SC_UNAUTHORIZED);
            response.getWriter().write("유효하지 않은 API 키입니다.");
        }
    }
}
FilterConfig.java
package me.dodo.readingnotes.config;

import org.springframework.boot.web.servlet.FilterRegistrationBean;
import org.springframework.context.annotation.Bean;
import org.springframework.context.annotation.Configuration;

@Configuration
public class FilterConfig {

    @Bean
    public FilterRegistrationBean<ApiKeyFilter> apiKeyFilter(ApiKeyFilter filter) {
        FilterRegistrationBean<ApiKeyFilter> registration = new FilterRegistrationBean<>();
        registration.setFilter(filter);
        registration.addUrlPatterns("/records/*"); // 보호할 URL 패턴
        registration.setOrder(1); // 필터 순서
        return registration;
    }
}
에러
Description:
The bean 'apiKeyFilter', defined in class path resource [me/dodo/readingnotes/config/FilterConfig.class], could not be registered. A bean with that name has already been defined in file [E:\reading-notes\build\classes\java\main\me\dodo\readingnotes\config\ApiKeyFilter.class] and overriding is disabled.
Action:
Consider renaming one of the beans or enabling overriding by setting spring.main.allow-bean-definition-overriding=true
이게 뭐냐?
apiKeyFilter라는 이름의 bean이 두 군데에서 등록되고 있어서 충돌한다는 말임.
= FilterConfig.class에서 @Bean과 ApiKeyFilter.class의 @Component 2개가 있어서 그럼.
그러니 spring.main.allow-bean-definition-overriding=true 설정을 하라는 말인데
정말 쉽다. 그냥 application.properties에 spring.main.allow-bean-definition-overriding=true 한 줄 추가하면 됨.
근데!!! 이게 지금 당장은 편한 방법이지만 피하는 게 좋음.
왜 spring.main.allow-bean-definition-overriding=true 하면 안 됨?
1. 누가 어떤 빈을 덮었는지 추적이 어려워짐 → 디버깅 난이도 상승
2. 의도치 않게 중요한 빈이 덮어씌워질 수 있음!
3. 유지보수가 어려워짐
그럼 어떻게 하냐! → 중복된 빈 정의를 제거한다.
@Component를 제거하고 @Bean으로 수동 등록.
밑의 방식도 일단 에러가 났음.
ApiKeyFilter.java ← @Component 제거
package me.dodo.readingnotes.config;

import jakarta.servlet.FilterChain;
import jakarta.servlet.ServletException;
import jakarta.servlet.http.HttpServletRequest;
import jakarta.servlet.http.HttpServletResponse;
import org.springframework.beans.factory.annotation.Value;
import org.springframework.web.filter.OncePerRequestFilter;

import java.io.IOException;

//@Component <-- 이거 제거
public class ApiKeyFilter extends OncePerRequestFilter {

  //@Value("${app.api-key}") <-- 이거 이게 못 씀
    private String expectedApiKey;

    //(추가)생성자 통해서 api-key 전달
    public ApiKeyFilter(String expectedApiKey) {
        this.expectedApiKey = expectedApiKey;
    }

    @Override
    protected void doFilterInternal(HttpServletRequest request, HttpServletResponse response, FilterChain filterChain)
            throws ServletException, IOException {

        String apiKey = request.getHeader("X-API-KEY");
        System.out.println("요청 헤더에서 API 키: " + apiKey);

        if (expectedApiKey.equals(apiKey)) {
            filterChain.doFilter(request, response); // 통과
        } else {
            response.setStatus(HttpServletResponse.SC_UNAUTHORIZED);
            response.getWriter().write("유효하지 않은 API 키입니다.");
        }
    }
}
그런데 이제는 @Component가 아니니까, @Value 주입도 안 됨!
FilterConfig.java ← @Bean으로 수동 등록
package me.dodo.readingnotes.config;

import org.springframework.beans.factory.annotation.Value;
import org.springframework.boot.web.servlet.FilterRegistrationBean;
import org.springframework.context.annotation.Bean;
import org.springframework.context.annotation.Configuration;

@Configuration
public class FilterConfig {

	//Bean 수동 등록하니 @Value 사용 가능
    @Value("${app.api-key}")
    private String expectedApiKey;

    @Bean
    public FilterRegistrationBean<ApiKeyFilter> apiKeyFilter() {
        // 직접 생성자 호출해서 객체 만듦
        ApiKeyFilter filter = new ApiKeyFilter(expectedApiKey);

        FilterRegistrationBean<ApiKeyFilter> registration = new FilterRegistrationBean<>();
        registration.setFilter(filter);
        registration.addUrlPatterns("/records/*"); // 보호할 URL 패턴
        registration.setOrder(1); // 필터 순서
        return registration;
    }
}
이제 서버에서는 에러가 없고 테스트를 해봅니다.
ApiForm.js
import React, { useState } from "react";

function ApiTestForm() {
  const [form, setForm] = useState({
    title: "",
    date: "",
    sentence: "",
    comment: "",
  });
  const [response, setResponse] = useState("");

  const handleChange = (e) => {
    const { name, value } = e.target;
    setForm((prev) => ({ ...prev, [name]: value }));
  };

  const handleSubmit = async (e) => {
    e.preventDefault();

    try {
      const res = await fetch("http://localhost:8080/records", {
        method: "POST",
        headers: {
          "Content-Type": "application/json",
          "X-API-KEY": "my-secret-key", // ← 여기에 실제 발급한 API 키 넣어야 함.
        },
        body: JSON.stringify(form),
      });

      const result = await res.text(); // 에러도 텍스트로 출력 가능하게
      if (!res.ok) {
        setResponse("오류 발생:\n" + result);
      } else {
        setResponse("성공:\n" + result);
      }
    } catch (error) {
      setResponse("네트워크 오류:\n" + error.message);
    }
  };

  return (
    <div style={{ maxWidth: 500, margin: "auto" }}>
      <h2>테스트 (POST)</h2>
      <form onSubmit={handleSubmit}>
        <input
          name="title"
          placeholder="제목"
          value={form.title}
          onChange={handleChange}
          required
        />
        <input
          name="date"
          type="date"
          value={form.date}
          onChange={handleChange}
          required
        />
        <input
          name="sentence"
          placeholder="인상 깊은 문장"
          value={form.sentence}
          onChange={handleChange}
        />
        <input
          name="comment"
          placeholder="느낀 점"
          value={form.comment}
          onChange={handleChange}
        />
        <button type="submit">보내기</button>
      </form>
      <pre style={{ whiteSpace: "pre-wrap", marginTop: 20 }}>{response}</pre>
    </div>
  );
}

export default ApiTestForm;
"X-API-KEY": "my-secret-key" ← 여기에 실제 발급한 API 키 넣어야 함.
App.js
import React from "react";
import ApiForm from "./ApiForm";

function App() {
  return (
    <div className="App">
      <ApiForm />
    </div>
  );
}

export default App;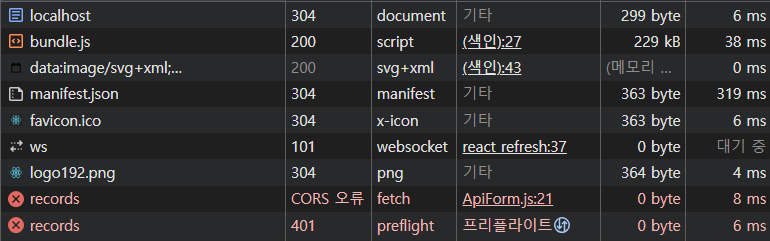
CORS 오류가 난다 나 괴롭히지마
암튼 왜 이러냐
fetch() 요청 보낼 때 X-API-KEY를 넣고 있음
근데! 브라우저는 Preflight (OPTIONS) 요청을 먼저 보냄
Preflight 요청이 뭔데?
브라우저가 본 요청을 보내기 전에, 서버가 이 요청을 받아줄 의향이 있는지 미리 물어보는 요청임.
CORS을 위해 다른 도메인으로 요청 보낼 때 위험한 요청이면 먼저 허락을 받는 과정이 필요함
→ 브라우저가 본 요청을 보내기 전에 자동으로 사전 요청(Preflight)을 보냄
Preflight 요청은 이런식으로 생겼음
OPTIONS /records HTTP/1.1
Origin: http://localhost:3000
Access-Control-Request-Method: POST
Access-Control-Request-Headers: X-API-KEY, Content-Type
이건 실제 데이터를 보내는 게 아니라 "얘가 이런 요청 보낼 건데, 받아줄거야?" 하고 서버에게 물어보는 요청임.
서버는 이 Preflight 요청을 보고 허용 여부를 알려줘야 함
정상적이면 밑처럼 응답해주심.
HTTP/1.1 200 OK
Access-Control-Allow-Origin: http://localhost:3000
Access-Control-Allow-Methods: POST
Access-Control-Allow-Headers: X-API-KEY, Content-Type
그러면 브라우저는 허락해준 건 받고 "허락했네? 이제 본 요청 보내야징" 하고 진짜 POST 요청을 보냄
만약 백엔드에서 이 OPTIONS 요청을
1. 아예 허용하지 않거나
2. 인증 필터(API 키 검사 등)에서 막아버리거나
3. 응답 헤더에 허용 정보를 안 넣으면
→ CORS 에러 발생
그래서 우리는 문제가 왜 생겼냐
Preflight 요청에도 ApiKeyFilter가 동작해서 API 키가 없다고 401 응답해버림.
(...ㅠ)
해결법은
ApiKeyFilter 수정해서 OPTIONS 요청은 통과시키기.
ApiKeyFilter.java
package me.dodo.readingnotes.config;

import jakarta.servlet.FilterChain;
import jakarta.servlet.ServletException;
import jakarta.servlet.http.HttpServletRequest;
import jakarta.servlet.http.HttpServletResponse;

import org.springframework.web.filter.OncePerRequestFilter;

import java.io.IOException;

public class ApiKeyFilter extends OncePerRequestFilter {

    String expectedApiKey;

    public ApiKeyFilter(String expectedApiKey) {
        this.expectedApiKey = expectedApiKey;
    }

    @Override
    protected void doFilterInternal(HttpServletRequest request, HttpServletResponse response, FilterChain filterChain)
            throws ServletException, IOException {

        // Preflight 요청은 바로 통과시킴
        if ("OPTIONS".equalsIgnoreCase(request.getMethod())) {
            response.setStatus(HttpServletResponse.SC_OK);
            filterChain.doFilter(request, response);
            return;
        }

        String apiKey = request.getHeader("X-API-KEY");
        System.out.println("요청 헤더에서 API 키: " + apiKey);

        if (expectedApiKey.equals(apiKey)) {
            filterChain.doFilter(request, response); // 통과
        } else {
            response.setStatus(HttpServletResponse.SC_UNAUTHORIZED);
            response.getWriter().write("유효하지 않은 API 키입니다.");
        }
    }
}

이제 잘 됨!!!
이 방식의 장점은
Preflight 요청을 따로 인증하지 않고 무조건 통과시키기 때문에 프론트에서 CORS 오류 없이 본 요청을 보낼 수 있음.
하지만 단점은
OPTIONS 요청도 공격자가 보낼 수는 있음.
→ 민감한 경로나 요청이면 너무 느슨하게 열어두지 않아야 함.
실무에서는 보안상 IP 제한, Origin 검사, Rate limit 등을 추가하기도 함.
근데 우리는 나중에 api key 대신 JWT, OAuth2 같은 인증 방식으로 교체할거라 자금은 이렇게 쓰겠음.
'Spring Boot project' 카테고리의 다른 글
| CORS 설정 (1) | 2025.04.18 |
|---|---|
| 제목, 작가, 날짜로 조회 (1) | 2025.04.17 |
| H2 DB 설정 (1) | 2025.04.14 |
| DTO 클래스 생성 Request, Response (1) | 2025.04.13 |
| ReadingRecordController 생성, get/post Test (1) | 2025.04.12 |


